Centerbase offers many options and settings for configuring the billing process to meet a firm’s distinct needs. From time entry through payment receipt, Centerbase’s billing settings make it easy to get bills out and paid.
The top level, or default, settings are managed in the System Settings (see Appendix A on the system setting page). The default settings will read in during time entry and can be overridden by on both the Client and Matter level. Matter settings will always override Client settings, which in turn will always override default settings.
As the main billable item in Centerbase, Matters have 4 billing related settings tabs (2 of which also live on the Client level): Rate Table, Origination, Billing and Trust. Depending on the client’s set-up, there may be additional tabs related to other functions.
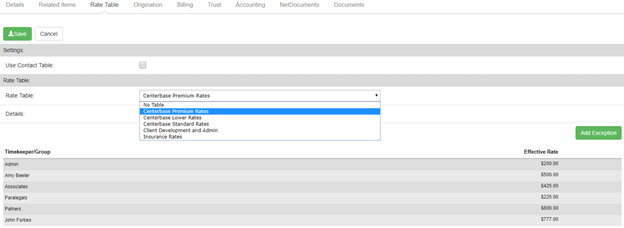
Rate Table Tab (also available on Client level)
Set a matter specific rate table or manage exceptions and override rates for the corresponding matter (or client) on a per timekeeper or group level. To edit these settings, click the tab and then the pencil to edit.
Originations Tab
Directly feeds the Production and Origination Report and allows users to set origination percentages for 1 or more timekeepers as well as Production splits for individual timekeepers. To set Production percentages, you will need to uncheck the Use Default Settings checkbox. See Appendix A for more information on P&O settings to configure the report to your client’s exact needs.

Billing Tab (also available on Client level)
Auto-Apply settings allow the user to override the system default settings for how to apply Client overpayments and trust funds to bills upon posting. If the auto-apply settings are enabled, the next bill for this matter will automatically attempt to apply unapplied payments or trust balances to pay of the balance of the bill. While the bill is in the Pre-Bill stage, it will show and “Auto-Applied Payment” transaction that represents any potential transactions. The transaction is not actually created until the bill is posted.
Under the billing entries section, you have the option to set the matter totally non-billable. This means that any new time entries will automatically be set as non-billable. This setting is great for firm matters or pro-bono work, where you do not want these values to show as billable time when reporting.
The final setting in the below screenshot refers to the bill template used for this matter. This setting only appears on client sites that have multiple distinct bill templates. During the template design process, Centerbase will attempt to make smart templates that do not require separate templates, and instead rely on matter/client settings to determine the information or format for the bill. If this is not possible, then an additional template will be created and will be available from the drop-down menu.

The Email Bill Settings allow users to specify one or more email addresses to be used when emailing posted bills to the client. If the checkbox for Use Client Settings is checked on the matter, then the bill will be sent to the email address defined on the client. If left unchecked, users should check the Email Bill checkbox, which places a green check in the Posted Bills grid as a visual queue that the bill should be emailed to the client.
Finally, the recipients section allows the user to enter multiple email addresses separated by commas, semicolons, or paragraph breaks. All specified email addresses will appear in the To: section of the email when emailing bills.
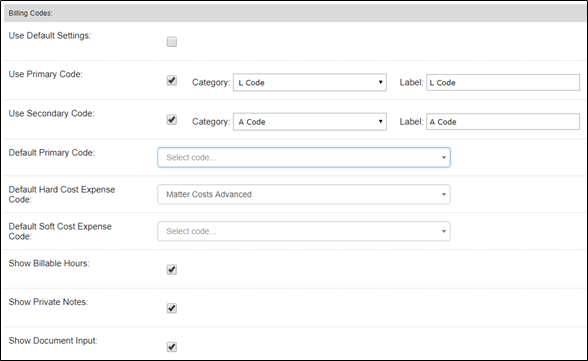
The Billing Codes section directly affects the user’s experience with the Time Sheet. Default settings may be set in the Billing section of the System Settings.
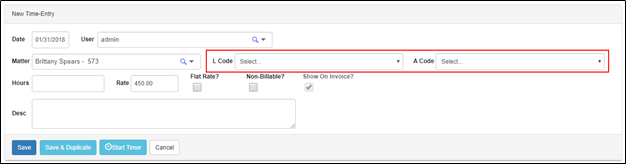
Unchecking the Use Default Settings checkbox allows the user to specify different settings for time entry. Checking the checkbox next to the Use Primary Code or Use Secondary Code makes both billing code drop-down menus appear for the specific matter during time entry. The Label field to the right determines what text shows in the time sheet for each code request.
Users can also not require code input for the system or by matter by unchecking both the primary and secondary checkboxes. However, Centerbase requires that all billing entries have a code, so you will need to select a Default Primary Code from the drop-down menu in this case (Otherwise, you will get a big red error when attempting to enter time for this matter.
Default Primary, Hard Cost and Soft Cost expense codes can be set on the matter level, but users can change the setting when entering their time or expense at the time of entry.
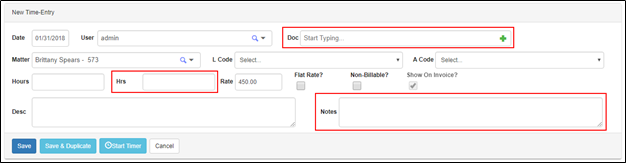
Show Billable hours turns on a secondary Hours box during time entry. Users will input their Actual time worked and can then adjust their billable hours up or down to reflect entry level write-ups or write-downs.
The Show Private Notes checkbox adds another text entry box on the time sheet to allow users to enter additional description of the time entry that will never appear on the bill. This is great for internal notes to Billing Partners or Billing Administrators.
Finally, the Show Document Input allows users to upload receipts and other documentation along with their entry. This is generally used to allow users to upload their receipts for expense entries.
Note: Can’t seem to get the billing codes you want to show in the drop-down menu? The Time, Expense, L code and A Code classes come standard with Centerbase, but you can add your own in the Item Manager > Billing Codes > Class Hierarchy settings. See section 2.2.2 for more information on setting this up. Once you have your desired class created, set it on the billing code records that should appear in the drop down.
For instance, if I wanted to make sure my L110 code appears in the L Code drop-down menu, I would go to the Billing Code homepage, select the L110 code and update the Category field to be L Code.
The LEDES Code field is also important to ensure the correct electronic billing code appears on any LEDES file.

The final section of the Billing settings, the Bill To Fields, allows the user to set the billing address to appear on all bills on a client/matter level. The information entered here will show at the top of the bill record in the envelope window section.

Trust Tab
|
 |

Comments
0 comments
Please sign in to leave a comment.