
Actions are used to direct the workflow. When an action is kicked off, it moves from one node to another continuing the workflow. An action can be either a User Action or Automatic Action.
- User Action: This action is manual, this will prompt a user to input or review information before moving forward.
- Automatic Action: This action is automated; this will not prompt the user anything and will look at certain criteria before moving forward. An automatic action can occur the moment the workflow enters a node (if it has no query associated) or can wait for certain criteria to be true to determine when (or even if) it executes.
Besides moving the workflow from node to node, there are two functions that actions serve.
First, if it is a User Action, you can associate an Action Form with the action.
- Action Form: This action can only be used with a User Action; this will prompt the user with text boxes to fill in based on the fields selected.
This will prompt the user to input or review information before moving forward in the Workflow. Any field on the current item can be used for forms, but the form cannot access other item fields unless through lookups (any associated blue link field on the record type). This means that sometimes Workflow specific fields must be created on one item to be used in the form and subsequently copied to another record. To add a form to a user action, click the cog icon next to the User Action and select Add Form or Edit Form.

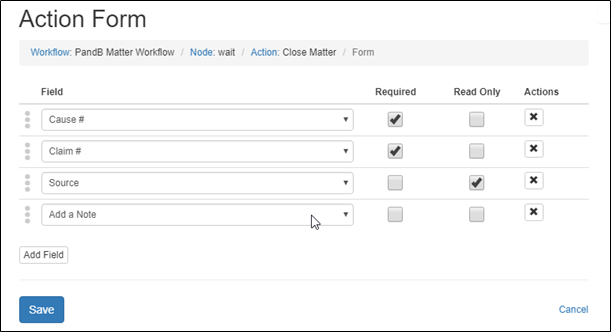
Here you can select as many fields as you want to show on the form.

When the form comes up, it will show the current value of those fields (or blank if it does not have a value). If you mark the field as Required, it will not let the user take the action until they fill in a value for those fields. If you mark it as Read Only, it will show the value of the field but not let them change it. This is useful when they might need to reference something like the Court Date or Defendant Email address, but not need to adjust that information. This form also has a special field called “Add a Note”. This will prompt them for some multi-line text and create a new note linked to the main record with information on who created the note and when.
Actions can also have one or more commands (like Create, Update, and Email) that are executed whenever the action is executed. As mentioned during triggers, these are the things that do things in Centerbase and bring automation to the process. An action can have as many commands as you want, however, the order the commands are executed cannot be controlled. So, if you need to make sure that a new record is created AND THEN an e-mail is sent, you’ll need to first have an action with a Create Command and then a second action with an E-mail Command to ensure they happen in the correct order.
If you only want an action to flow from one node to the next, you do not need to have any command or forms associated with it. Similarly, if you want to have an action execute a command but not continue in the workflow, you can have the action loop back to the same node (i.e. Start on a node and end on the same node). One example of this is let’s say we want to have a User Action on an unpaid bill that every time they take it the customer is sent an e-mail reminding them they still have a balance. We can have a wait node called Wait for Payment and a User Action called Send E-mail that goes from “Wait for Payment” to “Wait for Payment”. This will allow them to take the action as often as they need and not move forward in the flow until they are ready (say when a payment is received or the bill is fully paid). One thing to keep in mind with loops like this is to avoid infinite loops on automatic actions. For instance, if you instead made the Send E-mail action mentioned previously an Automatic Action, you’ll need to do something to make sure it doesn’t just keep sending e-mails repeatedly each second. One way to do this is by having an Update command set a field on the main record to indicate that the e-mail has been sent and then put criteria on the automatic action to only execute if the field is empty or (if it was a date field) the value of the field is more than a week old.
To add an action to a node, click the cog icon next to the nodes name and select Add Action. Here you will set up a couple of things:

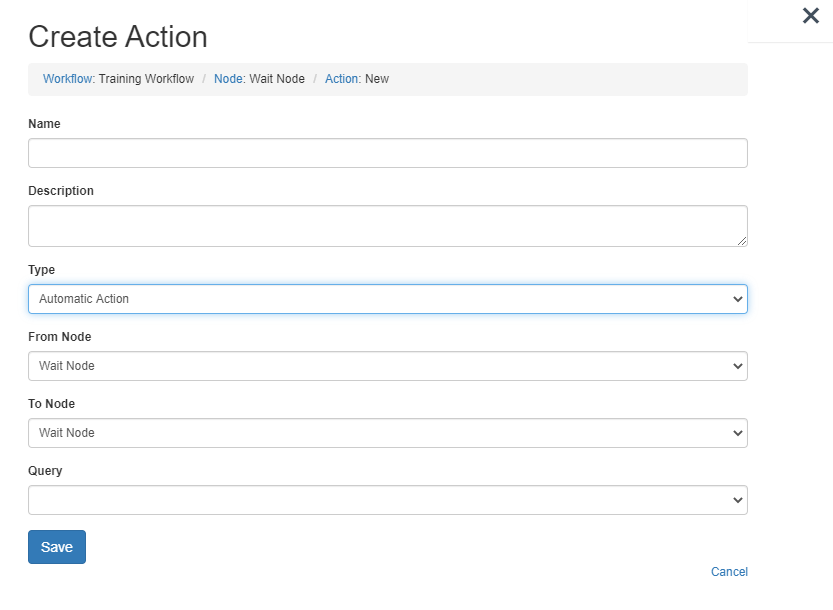
- Name: The name of the action being taken. If this is a user action, this will show up in the list of actions the user can take. This will also show up in the Workflow history as to which action was taken.
- Description (optional): A detailed description of what the action is and when it is taken. Can also be used to add notes about the history of changes made over time.
- Type: User Action or Automatic Action
- From Node: The node this action is associated with. This action can only be taken (by a user or automatically) if this node is currently active.
- To Node: The node to move the workflow to after taking this action. The To Node can be the same as the From Node.
- Query: Only applies to Automatic Actions. If a query is specified, an automatic action will only occur if the criteria in that query are true for the main record. If no query is specified, an automatic action will be executed as soon as the From Node is active. Queries can also be used to wait until a certain date. If you choose a date field (such as Court Date) in the query and then set the criteria as Within the Next 30 Days, the action will take place 30 days before the Court Date. Alternatively, if you set the criteria as Within the Past 30 Days, the action will take place 30 days after the Court Date.

Special User Action Things:
- All Users: Only applies to User Actions. Normally users will only see User Actions if they are assigned to them. However, if you select All Users, everyone can take the given action, even if they are not assigned to the task. This is useful when a person is assigned to do something, but you want to give other people the option to take that action.
- Assignee Role Type: There are two types of roles Groups and Users. All users in this group are created in the PC Admin Tool
- ID Type: There are two ID types Role and Field.
Role Type and ID type both must be set and the option associated with both are dependent on what is chosen.
- Groups & Role: These choices will be your User Profiles that can be set up in the System Settings -> User Information -> User Profiles
- Groups & Field: These choices will be associated with the fields linked on the record type
- Users & Role: These choices will be your Users on the system that can be set up in the PC Admin Tool by your Consultant or System Administrator
- Users & Field: These choices will be associated with the fields linked on the record type
Special User Action for E-PreBill Approval:
These options will only show up if you have pre-bill approval enabled on your site, this can only be done by Centerbase after being approved or paid for.
- Approval Action?: This is a normal approval action that allows the pre-bill to continue to more steps, you can have one or many Approval Actions throughout the workflow.
- Final Approval Action?: This is the final approval action that sends the pre-bill out of Pre-Bill Approval, you can only have one Final Approval Action throughout the workflow.
Next Recommended Workflow Articles
Comments
0 comments
Please sign in to leave a comment.